Pick-up/delivery settings
The first switches are just to enable pick-up and delivery, so you are able to use one of both or both of them. “Enable Pick-up”, “Enable Delivery”.
Underneath these setting you will find Distance check in basket:
In a normal order process, the system checks at the beginning if the delivery spot is close enough. This uses distance to see if it's in the delivery zone.
If you turn on the "Distance check in basket" option, it does an extra check at the end (in the shopping cart). If the user's address is not known, a small window pops up so they can add it.
You should always turn this on for deliveries. It stops problems, like if someone saves an order link and uses it later. The address might be gone then, but this lets them fix it.
Charge delivery costs: If you turn it on, at the very bottom of this page you can create different delivery costs per KM. You can fill in the delivery cost at add delivery costs area you want to charge your customers by determining the range. For example:

Here we have configured that from 0 Kilometer till 10 Kilometers we charge € 10,00 delivery fee. But you can also set up this like 0 till 5 Kilometers it is € 4,00 and 5 till 8 Kilometers € 6,00 and 8 till 10 Kilometers € 8,00
After that you have: “QR-code connected table” this is the table you’ve setup in the “Tables” page that you can find in the left menu. This is the QR code and not the WC (WebCode).

After that you will get the 2 tables you’ve setup for Pick-up and Delivery here you will have to pay close attention because the Pick-up table setting requires a QR code and the Delivery table setting requires a WebCode.
Delivery area
“Link group (admin)” here you can link a different sales area to this area, what this does is use the Delivery settings of that sales area you’ve filled in.
You can also set up the two delivery methods we support, Radius delivery and Postal Code delivery. So the first thing you will need to do is to choose what method the customer wants to use. “Delivery area (Radius)” will let you set up the range you want to use as delivery range, this is in Kilometers.
Or you will find the orange button “Postal Code Setup”. Here you can set up the second method we support, Delivery on postal code. What it means is, you can whitelist postal codes NL or blacklist.
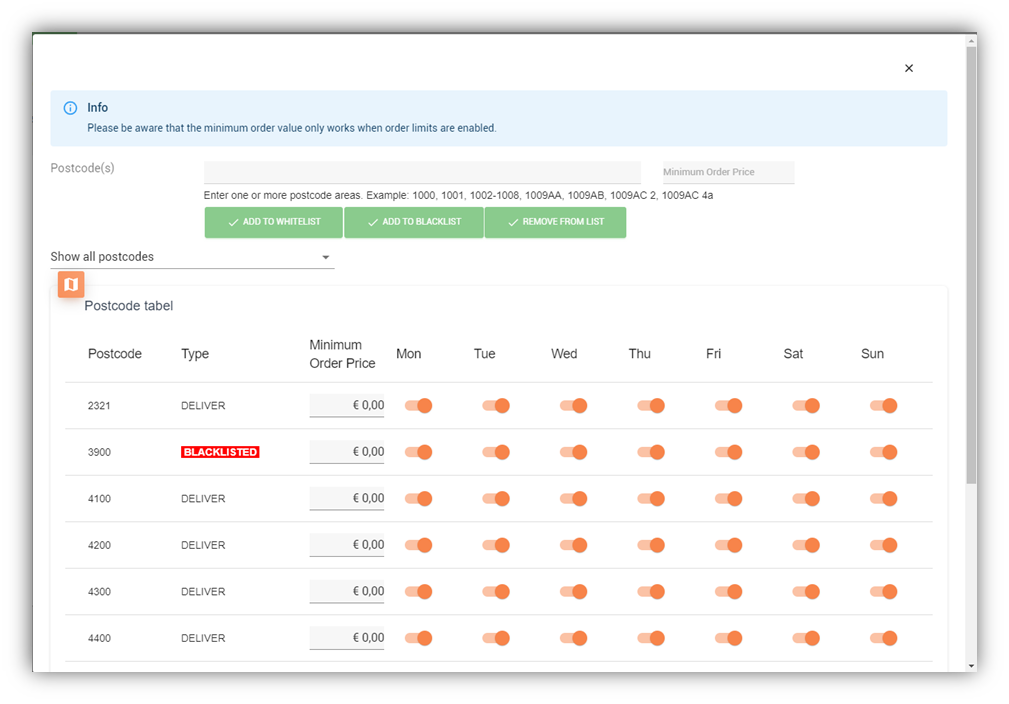
In the bar on top behind “Postcodes” you can enter on what Postal code you want to deliver or do not want to deliver.
Because you can also blacklist postal codes, for this case you also just fill in the postal code and press the green button “Add to blacklist”. When you want to add a postal code to deliver too it’s of course the green button “Add to whitelist”.
You can also delete postal codes whenever you’ve made a mistake by filling in that certain postal code and press “Remove from list”.
Within this page you can fill in what the minimum order price should be per Postal code. In this way you can give your customers who live further away from you a higher minimum order price.
Additional fees
The first one "Don't charge a delivery fee for the above orders". It allows you to configure how much your customers need to order before the delivery charges become free.
To be able to use any delivery costs you want to charge your customers you will need to set up a product especially for this (delivery costs product), so that Jamezz can use this product to add this to the shopping basket.
This product needs to be added within Jamezz when you are not using a POS linked sales area, whenever you are using a POS linked sales area you will need to add this product in the POS system.