Here you can find the opening hours, pre-ordering for special events, auto logout and pre ordering (Date and Time)
1. Opening hours
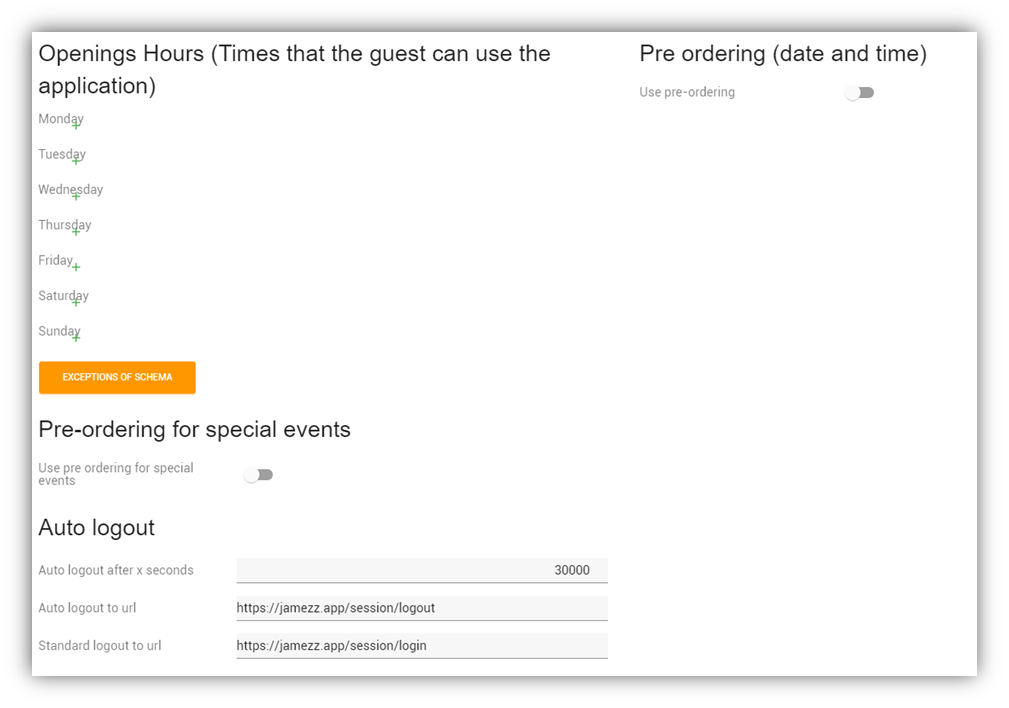
Here we can configure multiple things, as you can see the first thing you can edit here is your main openings hours for the application.
You can press the green plus icon that is well hidden in the name of the day.
If you press this icon, you will see a small window where you can enter your opening hours.
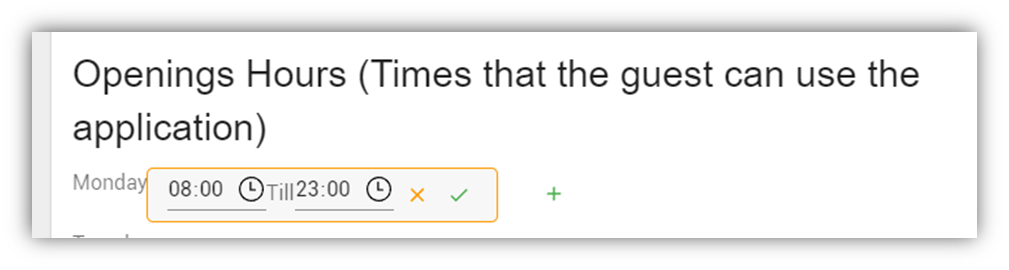
After you have entered the times you want to use, press the green confirmation button to save.
You can also create multiple time zones for a day like this for example:

Also you can create exceptions for in the future, as in for example you are going on a holiday and will be closing your Jamezz environment for a couple of days.
This can be done by pressing the orange button “Exceptions of schema”.
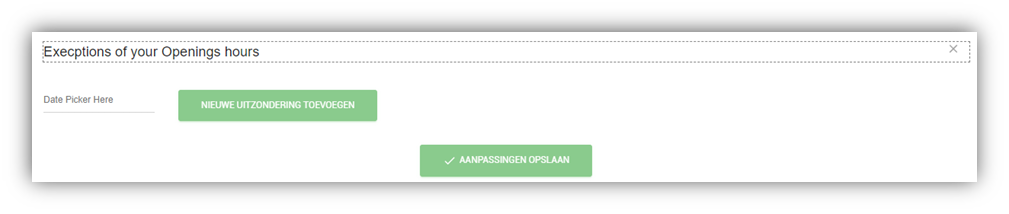
Here you are able to select the dates you are not available by pressing the date picker.
Afterwards you just press “Aanpassingen opslaan” and it will save these dates as exceptions.
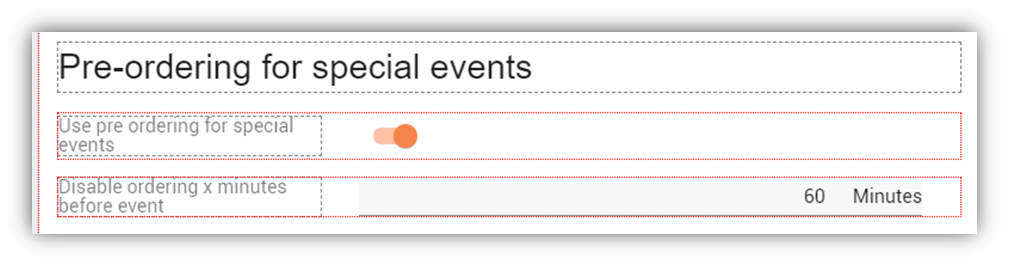
2. Pre-ordering for special events
This function is made for people that work with pre-ordering sales areas.
For example: a cinema where people can order tickets for in the future, this will only work in combination with certain Data fields and configuration of the special dates with in the “Pre ordering (Event)”. You can find this tab on the left side in the scroll menu.
When you enable this feature a second option will show up, this where you can setup how many minutes before the event ordering won’t be available anymore.
3. Auto logout
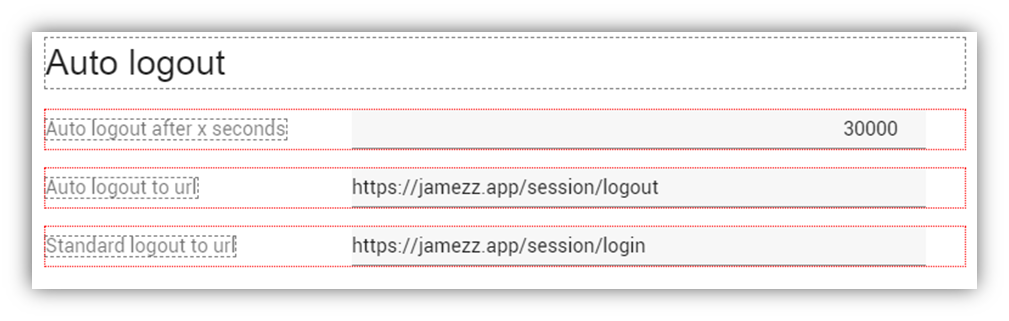
This part is made for the auto logout of the Jamezz application, what this does is whenever nothing happens on the user side within the Jamezz application it will automatically log this user out.
This can of course be changed how quickly this happens for the customer by changing "Auto logout after x seconds".
Then you can also change the link to where they will be redirected whenever this happens, this can be done by changing the “Auto logout to url”.
For the “Standard logout to url” We would recommend to not change this and leave this as it is, this will then always redirect you to the page where your customers can fill in the Webcode.
4. Pre ordering (Date and Time)
This is purely made for the webshop solution, here you can change when the customer can place his order.
By enabling this you will be able to configure it further.
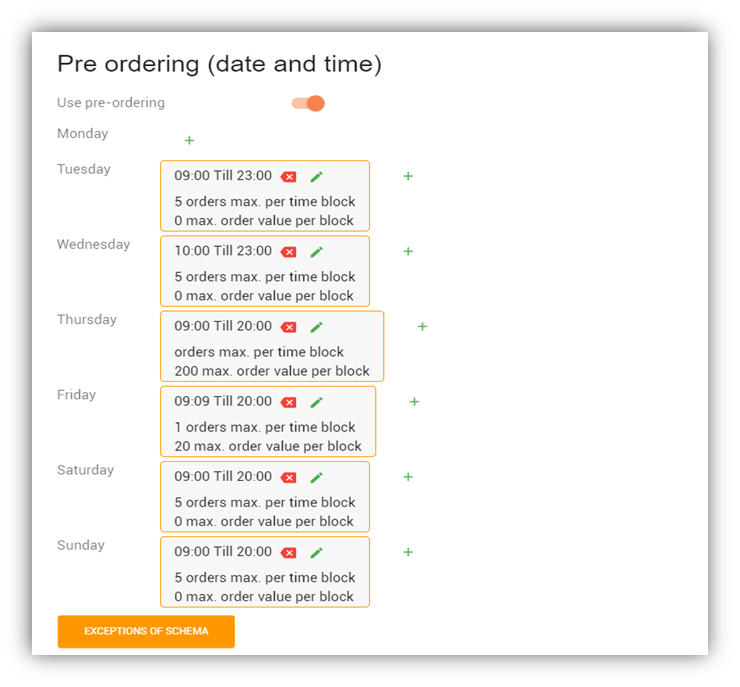
As you can see in the picture It’s exactly the same setup as the normal opening hours but here are there two extra settings you can edit.
Those are “Orders max per time block” and “max order value per block”, the first one is made for setting up the max order for each time frame. This will allow you to not get knees deep in your orders and not being able to make all of the orders for your customers.
This time block/frame can be setup a few sections down by “Time block between selection options”.
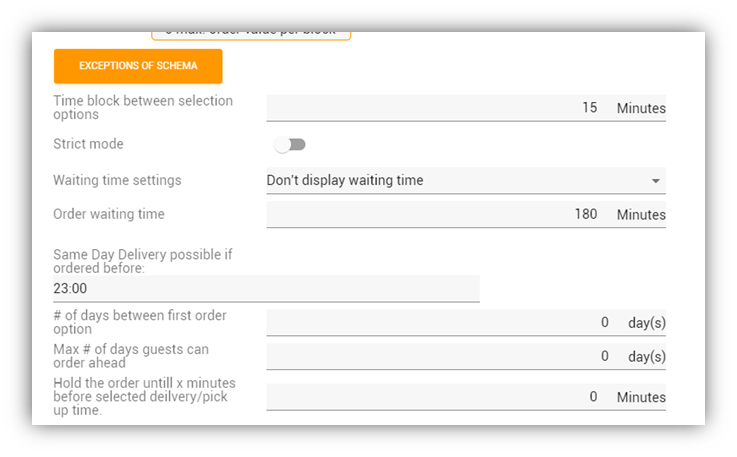 So in our example it’s setup with 15 minutes. This mean you can edit how many orders you can receive from your customers in 15 minutes.
For the 2nd option you can edit for how much money you let people order in that time frame.
Also here you can setup exceptions for when you would like people not to be able to order on certain days. This is exactly the same as the normal openings hours.
The next setting you will see is “Waiting time settings” this will let you choose multiple options:
1. Don’t display waiting time: This will not display a waiting time for the order and won’t enforce it either.
2. Waiting time of establishment is leading if product preparation takes longer than the waiting time:
This will enforce the waiting time you’ve filled in underneath this setting. What this does, is always use the waiting time of the sales area and does not let the product waiting time impact this time.
3. Waiting time of establishment + waiting time of product: This will use the waiting time you’ve filled in and adds the waiting time of the products that are being ordered, it will only add the highest waiting time from the products in the specific order.
After this setting you will see “Same Day Delivery possible if ordered before”. This will let you edit the time that will allow your customers to order with the same day delivery option.
So for example here it’s setup as 23:00, so if people order before that time they can still choose a pickup/delivery time today, but if they order after that specific time they won’t be able to order today anymore but the next day if setup of course.
You can setup how many days you want to skip for the first order option that will appear for your customer by editing the setting “(number)# of days between first order option”
Besides that you can also change how many days they can order in the future by editing the following setting “Max (number)# of days guest can order ahead”
And then for the last option on this page we have “Hold the order untill x minutes before selected delivery/pickup time” This will let you edit how long the order will be hold until we as Jamezz send it to your POS system, this will solve any confusion that could be created by orders that are ordered 4 days in advance.