General
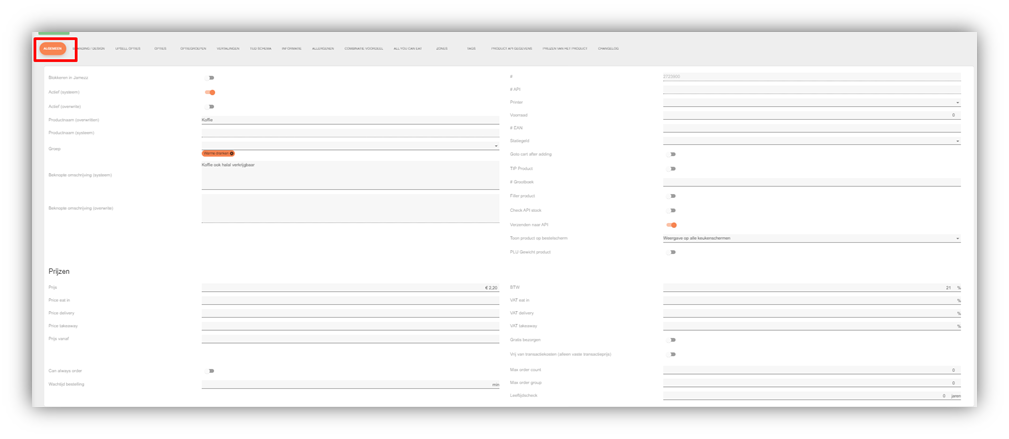
Blocking in Jamezz: Here you can block the selected product, which means that the product will no longer be displayed in the application.
Active (system): Here you can find if the product is active in Jamezz.
Active (overwrite): When you enable overwrite, it means that every time you perform a sync, the product is reset to the checkout settings.
Product name (overwritten): Here you can give a name to the product. However, in the back office it keeps its original name and in the application it shows the product name you want.
Group: Here you can put the selected product under a menu within your own sales area.
Brief description (overwrite): This description can only be filled in when the product has received a description from the checkout. In that case, you can overwrite the checkout description by writing the description here.
Brief description (system): This is the description that the product receives from the cash register.
Jamezz product ID#: This is the product ID that Jamezz gives the product when you create a product. This is always an unique code.
Product API ID#: This is the product ID that has been given to the product from the POS system, this can not be changed in Jamezz but only in the POS when needed.
Printer: Here you can select a printer and the product will be sent to the selected printer.
Stock: Here you can keep track of the stock of your products. When the stock is expired the product will be deactivated automatically.
#EAN: Here you can give the product an EAN code, this is for google seo marketing.
Refundable: To use this, you need to create a product in the cash register called refundable. Then you can hang the product below it and your customers will pay a deposit.
Go to shopping basket after adding this product: This function can be enabled and only be used in the older version so not in V5, what this does is go instantly to your shopping basket after adding the specific product.
Tip Product: Here you can enable if the selected product is going to be used as a Tip product or just as a normal product.
# Ledger number: is a specific number you can add to the product so it will be easier for the financial department to categorise the revenue data.
Check API Stock: If you enable this, your products will take into account the indicated stock in the checkout.
Send to API: This is automatically set to on. If you turn this off, it will not send the order to the checkout.
Show product on order screen: Here you can select an order screen on which the product should appear. For example, kitchen screen 2 or 3. The product will then only be displayed on these screens.
Prices
Price: Here you can fill in the price of the product.
Eat here price: Here you can give a price for the product when the product is also eaten in your own restaurant.
Price delivery: Here you can specify a price to be charged when the order is to be delivered.
Price Take Away: Here you can specify a price to be charged when the customer picks up his order.
Price from: Shows the starting price of the product, so for example the base product is €5,99 but can get higher when you add options etc.
VAT%: Here you can indicate in percentages how much VAT should be charged on the product.
VAT% eat in: Here you can set the amount of VAT to be charged on eat in product.
VAT% delivery: Here you can set the amount of VAT to be charged on delivery products.
VAT% takeaway: Here you can set the amount of VAT to be charged on takeaway products.
Free Delivery: By enabling this, you can enable free delivery.
Max order count: Here you can specify how often this product may be ordered in a certain timeframe.
Max order group: Here you can specify the maximum number of products that may be ordered within a menu at a specific time. For example, three dishes may be ordered within half an hour in the lunch menu.
Age check: Here you can turn on an age check on the product.